Evidence Summary
- Workflow run
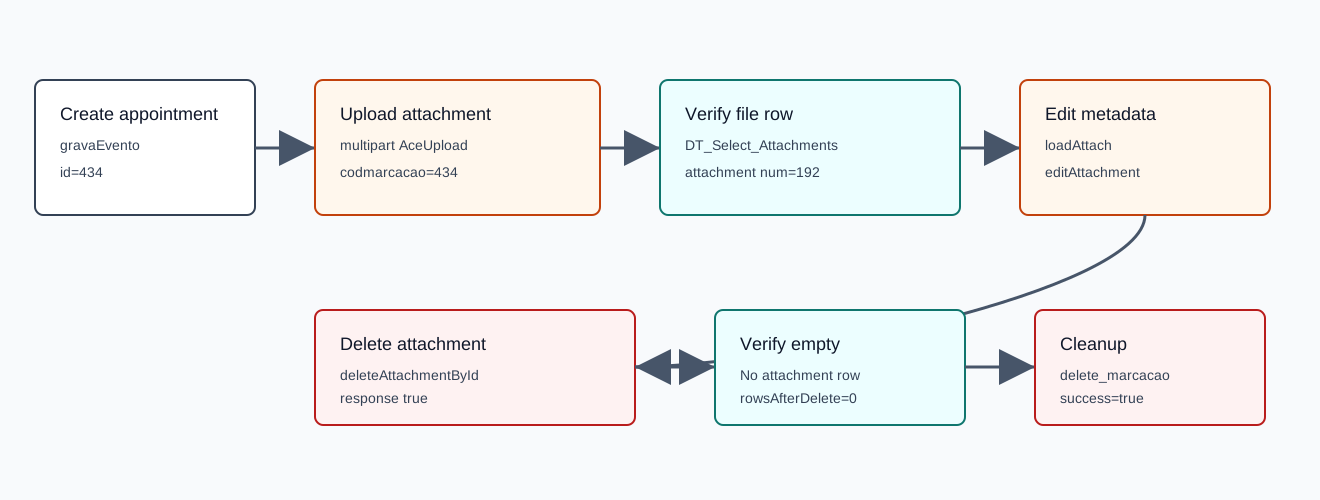
crm-appointment-attachment-20260519T121040Z- Appointment id
434- Attachment id
192- Uploaded file
ai-appointment-attachment-20260519T121040Z.txt- Final state
rowsAfterAttachmentDelete=0
Before You Start
- Open the appointment detail page from
/crm/marcacoes. - Open the Attachments tab.
- The Attach modal requires a description and a file or snapshot.
- The verified run used a normal file upload, not the camera/snapshot path.
Upload an Attachment
- Click Attach on the appointment detail page.
- Enter a description.
- Optionally choose a category and public flag.
- Choose or drop a file, then click Upload file.
The verified upload used multipart POST /ajaxserver with action=AceUpload, location=attachments, codempr=1, codmarcacao=434, assunto=AI appointment attachment 20260519T121040Z, public=1, and files[]. The response returned {"ok":true,"num":192} plus stored file metadata.
Edit Attachment Metadata
- Click the edit icon in the attachment row.
- Update the description, category, or public flag.
- Click Save.
The verified edit first loaded metadata with loadAttach and num=192. It then saved editAttachment with serialized form values num=192, edited assunto, empty categoria, and public=1. The next DT_Select_Attachments lookup returned row 192 with the edited description.
Delete an Attachment
- Click the delete icon in the attachment row.
- Confirm the prompt.
- Verify the file row disappears from the Attachments table.
The verified delete used deleteAttachmentById, tabela=Attach, and search[Num]=192. The endpoint returned bare JSON true, and the next DT_Select_Attachments call returned no row for attachment 192.
Artifacts
raw/playwright/workflows/crm-appointment-attachment-20260519T121040Z.jsonassets/screenshots/crm-appointment-attachment-20260519T121040Z-01-before-create.pngassets/screenshots/crm-appointment-attachment-20260519T121040Z-02-before-attachment.pngassets/screenshots/crm-appointment-attachment-20260519T121040Z-03-after-upload.pngassets/screenshots/crm-appointment-attachment-20260519T121040Z-04-after-edit.pngassets/screenshots/crm-appointment-attachment-20260519T121040Z-05-after-delete-attachment.pngassets/screenshots/crm-appointment-attachment-20260519T121040Z-06-after-delete-appointment.png